

Building a ChatGPT client app with Flutter

Introduction
In this blog post, we will build a simple conversational interface to chat with OpenAI's ChatGPT through its API.
There has been a lot of hype with OpenAI and ChatGPT lately, especially with GPT-4 being released recently. A ton of use cases for such tools have been popping up, but the most popular way people have been using ChatGPT so far is through chat.openai.com. I've been using ChatGPT to brainstorm ideas, write some Flutter code snippets, and even write the outline for this blog post! Of course, its suggested outline was quite optimistic so I had to leave some sections out, but it still provided enough pointers for me to be able to get started right away.
The official chat experience at OpenAI's chat interface is not great, however. It's very limited, and the chat history is often not working properly. There are already people building client apps for ChatGPT with a better UI and user experience, such as TypingMind, built with web technologies.
As a Flutter developer, I can't help but think that Flutter is a great fit for a ChatGPT client app! With cross-platform capabilities and a rich set of UI components, Flutter is a perfect choice for such a project. We can write the code once, and we could publish our app on the web, iOS, Android, and also the desktop platforms: Windows, macOS and Linux.
The ChatGPT API
To use any of OpenAI's APIs, you'll need to sign up and get an API key. You can do this here. Please note that API usage can cost money and you will need to provide payment details. The gpt-3.5-turbo model specifically, which we will be using, is quite cheap and should not cost more than a few cents unless you use it a lot.
Specifically, we will be using the Chat API (chat completions), which supports two of OpenAI's models: gpt-3.5-turbo and gpt-4. We can find the full reference for the Chat API here, which involves performing a POST request at https://api.openai.com/v1/chat/completions.
At this point, we could use the http library to perform the request with the required data to the Chat API, and parse the response. However, thanks to the Dart and Flutter communities, there is already a package available on pub.dev: dart_openai. It will make the API request for us and return a parsed response, so we can simply grab the response text and display it in the app.
Here is what a method that accepts a user message and returns ChatGPT's response looks like:
Future<String> completeChat(String message) async {
  final chatCompletion = await OpenAI.instance.chat.create(
    model: 'gpt-3.5-turbo',
    messages: [
      OpenAIChatCompletionChoiceMessageModel(
        content: message,
        role: 'user',
      ),
    ],
  );
  return chatCompletion.choices.first.message.content;
}
Since this will be a conversation, we need to pass previous messages to the request, so that ChatGPT has the whole context of the conversation so far, and not just the user's last message.
class ChatMessage {
  ChatMessage(this.content, this.isUserMessage);

  final String content;
  final bool isUserMessage;
}

Future<String> completeChat(List<ChatMessage> messages) async {
  final chatCompletion = await OpenAI.instance.chat.create(
    model: 'gpt-3.5-turbo',
    messages: [
      ...previousMessages.map(
        (e) => OpenAIChatCompletionChoiceMessageModel(
          role: e.isUserMessage ? 'user' : 'assistant',
          content: e.content,
        ),
      ),
    ],
  );
  return chatCompletion.choices.first.message.content;
}
The above method accepts the user's last message and all previous messages in the conversation. Note that ChatGPT's responses are marked with the role assistant in the API request.
Let's put the final version of our completeChat method to a ChatApi class, to be used later.
// models/chat_message.dart
class ChatMessage {
  ChatMessage(this.content, this.isUserMessage);

  final String content;
  final bool isUserMessage;
}
// api/chat_api.dart
import 'package:chatgpt_client/models/chat_message.dart';
import 'package:chatgpt_client/secrets.dart';
import 'package:dart_openai/openai.dart';

class ChatApi {
  static const _model = 'gpt-3.5-turbo';

  ChatApi() {
    OpenAI.apiKey = openAiApiKey;
    OpenAI.organization = openAiOrg;
  }

  Future<String> completeChat(List<ChatMessage> messages) async {
    final chatCompletion = await OpenAI.instance.chat.create(
      model: _model,
      messages: messages
          .map((e) => OpenAIChatCompletionChoiceMessageModel(
                role: e.isUserMessage ? 'user' : 'assistant',
                content: e.content,
              ))
          .toList(),
    );
    return chatCompletion.choices.first.message.content;
  }
}
Note that in the constructor, we are setting the API key and organization ID. Without the API key, any request will fail. Organization ID is optional and can be provided in case you have multiple organizations set up with the OpenAI platform.
// secrets.dart
const openAiApiKey = 'YOUR_API_KEY';
const openAiOrg = 'YOUR_ORGANIZATION_ID';
The secrets file is included in .gitignore to avoid committing it to version control. In the project repository on GitHub, a secrets_example.dart file is provided with placeholder values.
A note on API keys
In this post, we are building a client app. An app like this one with the API key hard-coded should not be published. Since API usage can cost, you don't want to expose your API key.
If you want to publish such an app, you have two options:
Allow users to provide their own API key to start chatting. Users can provide their key through the app and you can securely store it in local storage, to be used in every API request.
Rather than calling the Chat API directly, call a server, or edge function which will then call the Chat API with your own token. This way, you won't expose your API key, can control the traffic, as well as have additional authorization and rate-limiting requirements. If you go with this approach, you might want to consider monetizing, as users who use the app a lot will cost you money!
The chat interface
With the Chat API ready to be used, it's time to build the UI. If you're starting from scratch, you can use flutter create to initialize a Flutter project:
flutter create my_chatgpt_client
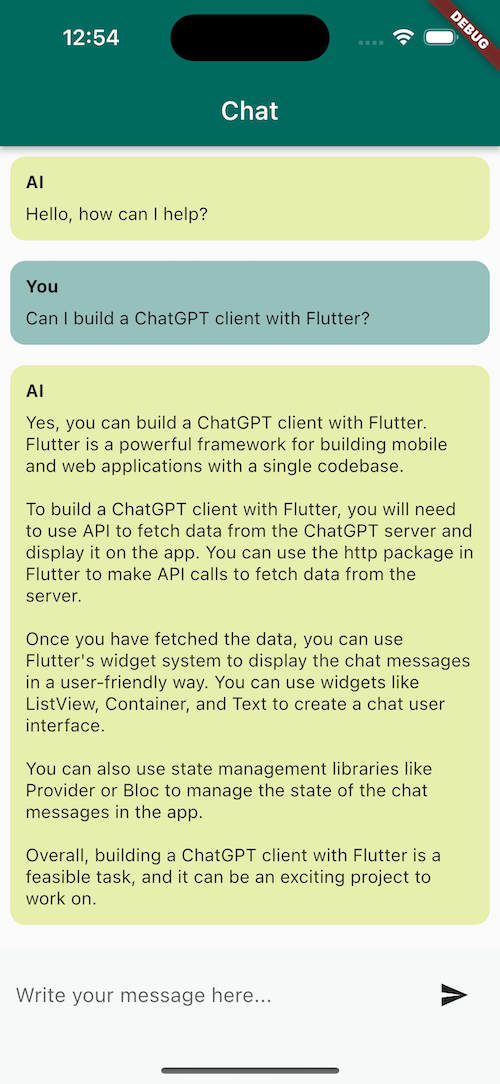
The UI will be pretty standard and will contain two main widgets: the message composer, and the message bubble. The main screen will be a list of all messages in the chat (as message bubbles), with the message composer at the bottom where we can type in the messages.
Let's start with the message composer widget:
// widgets/message_composer.dart
import 'package:flutter/material.dart';

class MessageComposer extends StatelessWidget {
  MessageComposer({
    required this.onSubmitted,
    required this.awaitingResponse,
    super.key,
  });

  final TextEditingController _messageController = TextEditingController();

  final void Function(String) onSubmitted;
  final bool awaitingResponse;

  @override
  Widget build(BuildContext context) {
    return Container(
      padding: const EdgeInsets.all(12),
      color: Theme.of(context).colorScheme.secondaryContainer.withOpacity(0.05),
      child: SafeArea(
        child: Row(
          children: [
            Expanded(
              child: !awaitingResponse
                  ? TextField(
                      controller: _messageController,
                      onSubmitted: onSubmitted,
                      decoration: const InputDecoration(
                        hintText: 'Write your message here...',
                        border: InputBorder.none,
                      ),
                    )
                  : Row(
                      mainAxisAlignment: MainAxisAlignment.center,
                      children: const [
                        SizedBox(
                          height: 24,
                          width: 24,
                          child: CircularProgressIndicator(),
                        ),
                        Padding(
                          padding: EdgeInsets.all(16),
                          child: Text('Fetching response...'),
                        ),
                      ],
                    ),
            ),
            IconButton(
              onPressed: !awaitingResponse
                  ? () => onSubmitted(_messageController.text)
                  : null,
              icon: const Icon(Icons.send),
            ),
          ],
        ),
      ),
    );
  }
}
The message composer will call the onSubmitted method we pass to it when the text field is submitted (e.g. by pressing Enter), or when we tap on the send button on the right. With the awaitingResponse flag, we can hide the text field and disable the send button. We will set this flag to true while a message submission is in progress and we await the API's response.
The message bubble widget is a simple container, with a different background color and sender name depending on whether it's a user message or an AI-generated one:
// widgets/message_bubble.dart
import 'package:flutter/material.dart';

class MessageBubble extends StatelessWidget {
  const MessageBubble({
    required this.content,
    required this.isUserMessage,
    super.key,
  });

  final String content;
  final bool isUserMessage;

  @override
  Widget build(BuildContext context) {
    final themeData = Theme.of(context);
    return Container(
      margin: const EdgeInsets.all(8),
      decoration: BoxDecoration(
        color: isUserMessage
            ? themeData.colorScheme.primary.withOpacity(0.4)
            : themeData.colorScheme.secondary.withOpacity(0.4),
        borderRadius: const BorderRadius.all(Radius.circular(12)),
      ),
      child: Padding(
        padding: const EdgeInsets.all(12),
        child: Column(
          crossAxisAlignment: CrossAxisAlignment.start,
          children: [
            Row(
              children: [
                Text(
                  isUserMessage ? 'You' : 'AI',
                  style: const TextStyle(fontWeight: FontWeight.bold),
                ),
              ],
            ),
            const SizedBox(height: 8),
            Text(content),
          ],
        ),
      ),
    );
  }
}
We now have all the necessary smaller widgets, now let's put them all together on the main page.
Here is what the code for the main chat page looks like:
// chat_page.dart
import 'package:chatgpt_client/api/chat_api.dart';
import 'package:chatgpt_client/models/chat_message.dart';
import 'package:chatgpt_client/widgets/message_bubble.dart';
import 'package:chatgpt_client/widgets/message_composer.dart';
import 'package:flutter/material.dart';

class ChatPage extends StatefulWidget {
  const ChatPage({
    required this.chatApi,
    super.key,
  });

  final ChatApi chatApi;

  @override
  State<ChatPage> createState() => _ChatPageState();
}

class _ChatPageState extends State<ChatPage> {
  final _messages = <ChatMessage>[
    ChatMessage('Hello, how can I help?', false),
  ];
  var _awaitingResponse = false;

  @override
  Widget build(BuildContext context) {
    return Scaffold(
      appBar: AppBar(title: const Text('Chat')),
      body: Column(
        children: [
          Expanded(
            child: ListView(
              children: [
                ..._messages.map(
                  (msg) => MessageBubble(
                    content: msg.content,
                    isUserMessage: msg.isUserMessage,
                  ),
                ),
              ],
            ),
          ),
          MessageComposer(
            onSubmitted: _onSubmitted,
            awaitingResponse: _awaitingResponse,
          ),
        ],
      ),
    );
  }
}
This is a stateful widget that starts with the message "How can I help?", just so we don't start with an empty chat.
The final piece is the _onSubmitted method, called through the message composer when a message is submitted.
Future<void> _onSubmitted(String message) async {
  setState(() {
    _messages.add(ChatMessage(message, true));
    _awaitingResponse = true;
  });
  final response = await widget.chatApi.completeChat(_messages);
  setState(() {
    _messages.add(ChatMessage(response, false));
    _awaitingResponse = false;
  });
}
When a message is submitted, we add the message to the chat messages and set _awaitingResponse to true, wrapped in a setState call. This will show the user message in the conversation, and disable the message composer.
Next, we pass all messages to the Chat API and await the response. Once we have the response, we add it as a chat message in _messages and set _awaitingResponse back to false, wrapped in a second setState call.
And that's it for the conversation flow! Let's see it in action:
This is the code for the App and the main method:
import 'package:chatgpt_client/api/chat_api.dart';
import 'package:chatgpt_client/chat_page.dart';
import 'package:flutter/material.dart';

void main() {
  runApp(ChatApp(chatApi: ChatApi()));
}

class ChatApp extends StatelessWidget {
  const ChatApp({required this.chatApi, super.key});

  final ChatApi chatApi;

  @override
  Widget build(BuildContext context) {
    return MaterialApp(
      title: 'ChatGPT Client',
      theme: ThemeData(
        colorScheme: ColorScheme.fromSeed(
          seedColor: Colors.teal,
          secondary: Colors.lime,
        ),
      ),
      home: ChatPage(chatApi: chatApi),
    );
  }
}
Parsing markdown
In our previous conversation with ChatGPT, we ask the follow-up question "show me the code".
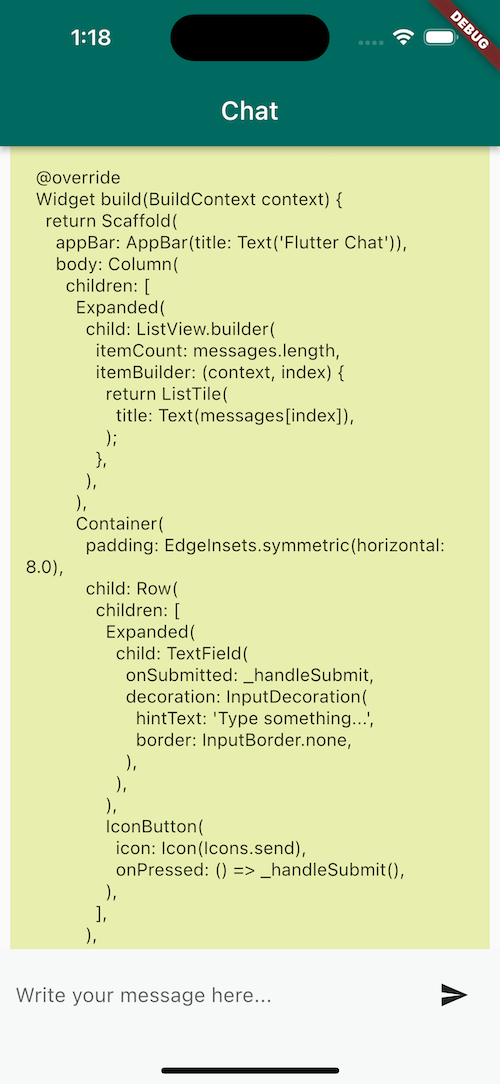
We get a decent amount of Flutter code in the response, but it's all in markdown! Let's use the markdown_widget package to solve this.
flutter pub add markdown_widget
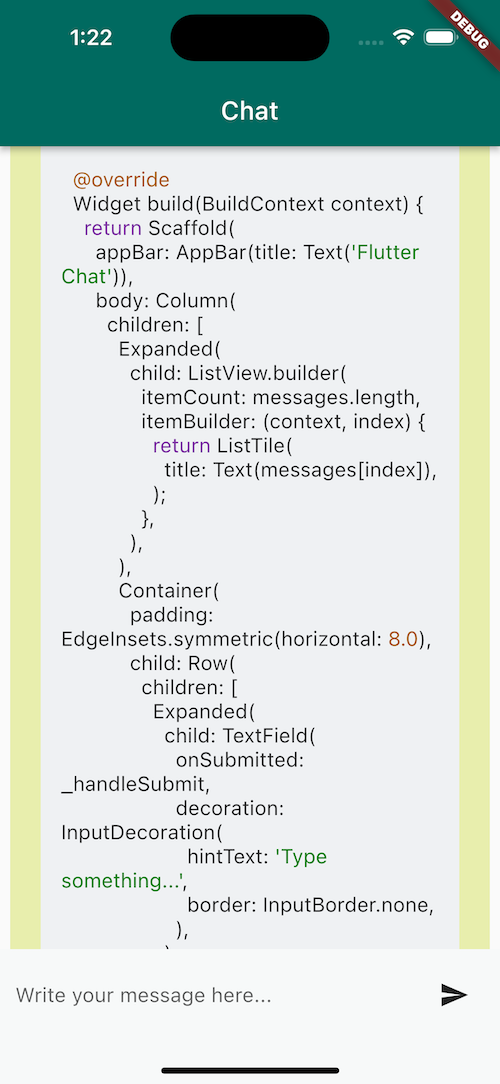
In the MessageBubble widget, replace the Text widget containing the message content with a MarkdownWidget:
MarkdownWidget(
  data: content,
  shrinkWrap: true,
)
One hot reload later, and we can see that the code is now properly parsed. That was easy!
Error handling
What if we get an error response from OpenAI? While testing, I did run into a few 429 (Too Many Requests) exceptions. Such an error could happen if you are calling the API too often, but also if the OpenAI API is getting too many requests in general.
The least we can do is handle the error and display a useful message. Here's a revised _onSubmitted method:
Future<void> _onSubmitted(String message) async {
  setState(() {
    _messages.add(ChatMessage(message, true));
    _awaitingResponse = true;
  });
  try {
    final response = await widget.chatApi.completeChat(_messages);
    setState(() {
      _messages.add(ChatMessage(response, false));
      _awaitingResponse = false;
    });
  } catch (err) {
    ScaffoldMessenger.of(context).showSnackBar(
      const SnackBar(content: Text('An error occurred. Please try again.')),
    );
    setState(() {
      _awaitingResponse = false;
    });
  }
}
Of course, this could be improved even further. We can provide an option to retry the response without needing to send a new message, but also automatically retry the request in ChatApi without showing an error.
Wrapping up
We now have a fully working chat app to chat with ChatGPT at any time, on any platform!
In this post, we showed how to build a basic chat app to have conversations with ChatGPT through OpenAI's chat API. We also added some additional features such as markdown parsing and error handling.
The functionality is quite basic, but there's a lot more we can do with such an app. We could have useful features such as being able to copy and/or share the responses. Additionally, we can use a local or cloud database to store the conversations so we can access them at any time.
You can find the source code here.
Are you interested in building a ChatGPT client, or building a Flutter app utilizing ChatGPT? Or would you be interested in any follow-up articles where we improve this app by adding more features such as conversation storage and organization? Let me know in the comments!
If you found this helpful and would like to be notified of future posts and tutorials, please subscribe to the newsletter with your email below!


